Use WinZIP or a similar utility-- e.g. PKunZIP on the IIgs-- to obtain PhotonixDev.sdk from
PhotonixDev_sdk.zip. On the IIgs use GS-ShrinkIt to unshrink the .sdk archive to 800k disk.
Photonix II v2.50 Released!
Olivier Goguel and FTA hereby releases Photonix to "freeware" status. This software may be copied and distributed free of charge. It may be modified by the end user if necessary for their specific use, however at no times may any modification be made and mass distributed to others without the express permission of FTA. FTA makes no claims to usability to the end user, will no longer supply customer support or written material related to the use of this software. . by Charles T. "Doctor Tom" Turley GS WorldView Editor
The Original
I must admit that the "freeware release" of the Photonix II disk copy
utility was interesting
news-- considering that the author and President of the FTA, Olivier
Goguel, released it into
public domain with the full source codes back in 1994. (Olivier
sent me the disk of the last
unfinished v2.50 Photonix, including files and source codes, back in
1994. A hand-signed
letter clearly stated that the material was placed into the public
domain.)
The original material is still of interest and, possibly, of practical
use, too. I have included it
here in a zipped .sdk archive file PhotonixDev_sdk.zip along with some
original v2.50
screen shots:
![]() Photonix
v2.50 Development Disk
Photonix
v2.50 Development Disk
Use WinZIP or a similar utility-- e.g. PKunZIP
on the IIgs-- to obtain PhotonixDev.sdk from
PhotonixDev_sdk.zip. On the IIgs use GS-ShrinkIt
to unshrink the .sdk archive to 800k disk.
The New
Thanks to the efforts of Olivier Goguel and Howard Katz of the Lost
Classics Project (who
urged release of the finished v2.50 Photonix II) a fine and fun
to use Apple IIgs super-res
disk copy utility is now available for downloading and use by all GS
owners.
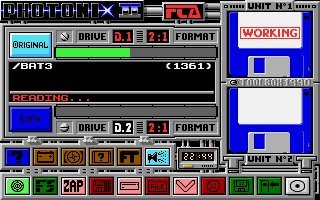
As the Contol Panel screen makes clear, Photonix II turns your IIgs
into a fast disk copy
machine. It can also format disks, save BatteryRAM settings, and check
for viruses.

Part of the fun of using Photonix II is checking the Credits (click
on the "?" icon).
Scrolling across the bottom, you get the expected listing of those
responsible for the
program (along with assorted messages). Plus, there is music,
the rotating "FTA"
logo, and even a moon shuttle that moves across the screen!
Documentation (reproduced below) is by Joe Walters.
It is also included in the Photonix250
.shk archive in both Text and Appleworks form. (The file Photonix.AWP
is AppleWorks 5.1
format with outliner stuff. You switch between outliner and normal
with oa-shift-+. The file
Photonix.TXT is the Text version of Photonix.AWP.)
Download the GS WorldView Distribution
The GSWV distribution of the v2.50 archive is Photonix250nu_shk.zip.
The "nu" indicates that
doc files are correctly filetyped and that the .shk file will unshrink
to a folder named "Photonix2"
which contains the program and doc files.
To obtain the .shk ShrinkIt file, use WinZIP or a similar utility on
the PC or Mac. If the .zip file
is transferred to the IIgs, use PKunZIP.
Once you have the .shk archive on the IIgs, use GS-ShrinkIt to unshrink
to 3.5" 800k diskette,
hard disk, or Zip disk.
Note: Running Photonix v2.50 will wipe a RAM5/
RAM disk. If you have placed files on
RAM disk which you wish to preserve, move
them before starting Photonix.
![]() Download
the Photonix v2.50 September 2000 Release
Download
the Photonix v2.50 September 2000 Release
___________________________________
PHOTONIX v2.5 DOCUMENTATION
by Joe Walters
INTRODUCTION
Photonix II is a new copying program for the Apple IIgs: it brings
together esthetics and technical performance with an attractive
look, efficiency, and speed and effectiveness of its copying
options.
Minimum requirements for the use of Photonix II
- An Apple IIgs, ROM 00, 01, of 03
- A minimum of one Apple 3.5" disk drive, two is useful
- At least 1.128 Megabytes of memory
Please note that Photonix II only functions correctly with original
Apple 3.5 disk drives. Photonix II does not work with Unidisk's
Apple 3.5 or compatibles i.e., AMR.
Running Photonix II
To execute Photonix II, it is sufficient to insert the program disk
in drive 1 and turn on your computer. Photonix will load itself
automatically and you will see the title screen appear in about 10
seconds.
Please note that if you hit the Option key while the program is
loading, you will pass directly to the main menu of Photonix II
without seeing the title screen.
Installing Photonix II on a hard disk
To install Photonix II on a hard disk, all that is necessary is to
copy two files (PHX.SYSTEM and PHX.DATA) from the program disk of
Photonix II to the same directory on the hard disk.
THE PRESENTATION OF THE PROGRAM
Once loaded, go past the title screen by pressing any key and the
principle screen of Photonix II will appear. This screen is composed
of many parts as described below.
Disk Windows
If you have 2 disk drives, the upper window represents drive 1 and
the lower window is drive 2. If, however, you only have 1 drive, the
lower window will appear broken. These windows will show you what to
do with the disks during the copy procedure depending on their
contents.
The Commentary Window
Found to the left of the Drive 1 and Drive 2 windows is where you
will see messages from the copying routine. It should be noted that
the language used by the message generator is English or French. To
change the language used, see section 4.11.
The Format Information Windows - Indicators
These windows are situated above and below the commentary window.
the top window is reserved for the original diskette, in other
words, the disk you wish to copy. The bottom windows contain
information of the format used on the diskette (interleave and drive
number) as well as copy indicator which shows the time remaining to
finish the copy.
The two ICON lines
The ICONS (at the bottom of the screen), are used to choose the copy
options and for adjustments. To select an ICON, move the robot arm
with the mouse and click on the ICON in question. The ICONs are
found on 2 lines: The first is the command ICONs and the second are
the option ICONs.
The Clock Window
This window is found to the right of the first line of ICONs and is
used to show the time of the internal clock of the Apple IIgs. By
pushing (with the aid of the robot arm), on the yellow button below
the numeric display, the number of copies made with Photonix II
since its installation on your Apple IIgs will be displayed for
several seconds.
THE COMMANDS
The commands are of two types: those made by choosing one of the
command ICONs, and Those made via the keyboard. In Photonix II, most
of the commands are accessible by an ICON.
The Keyboard Commands
The commands are not case sensitive and are available in the main
menu when the robot arm is visible on the screen.
The key "Q"
To quit Photonix II and boot another disk. Please note that if you
hit "Q" without inserting a disk, Photonix II will re-boot what is
available i.e., it re-boot from the hard disk if no floppy is
installed in the 3.5" Drive 1.
NOTE: Actually, since I have it installed on a HD I cannot make it
boot a disk in the 3.5" Drive 1. When you hit "Q" it tells you to
insert a disk or Esc to abort. Inserting a bootable disk followed by
Return causes the HD to be booted.
Given the above, the quickest way to quit Photonix II is to hit the
"Q" key twice.
The key "V"
Displays the version number and copyright date.
The key "M"
Shows the status of memory i.e., has a disk been read into memory
and if so, what is its name? It always prints "IN MEMORY" in red in
the bottom of the window. If there is NOT a disk in memory it prints
"EMPTY" in the middle of the window.
If there is a disk in memory the screen is refreshed with the name
of that disk. (Normally, it is already there. To see the refresh
click on the battery ICON and then type M.
The. key "C"
Displays the number of copies made with Photonix II in place of the
time. This is the keyboard equivalent of clicking on the yellow
button below the numeric counter (see section 2.5).
The ESC key
At all time the Esc key can be used to interrupt an operation in
progress and return to the main menu (the robot arm reappears).
Commands accessible by the command ICONs
? (In blue)
Display an animated page of information about the authors of
Photonix II. Esc gets you back.
Battery (In brown)
Save all settings in battery backed up RAM. The settings are saved
in octets $C0 to $C8 on the BRAM.
Format (In brown)
Format a diskette and install the catalog and volume name that you
provide (the default name is UNTITLED or SANSNOM according to
the
display language.) The is the same format as Copy ][+, but the
execution is quicker.
HINT: If formatting a large number of disks then format one disk and
then use Mass Copy (see section 4.4) to copy this formatted disk to
each of the other disks. Much quicker. Especially if you have two
3.5" disk drives since Photonix II alternates between the drives in
Mass Copy mode.
Disk Outline with ? in Center (In brown)
Read and display the ROOT directory. You can move in this display
using the arrow keys. Photonix II remains in this mode so if you
insert a new disk the ROOT directory of this new disk will be
displayed. Press Esc or Return to return to the main menu.
FT (In brown)
Allows interleaving selection. There are four options and clicking
on FT selects the next available option. The options are: AUTO, 2:1,
3:1, and 4:1. Disks under GS/OS or ProDOS 8 use 2:1 interleaving
while those formatted under ProDOS 16 use 4:1. Interleaving of 3:1
is not normally used. AUTO will force the copy to have the same
interleave format as the original so unless you have need to change
the interleave, this is the best option.
NOTE: If you want to permanently change this setting then be sure
and click on the Battery so the setting is saved to Battery RAM.
(See 3.2.2.)
Speaker (In blue)
This is the On/Off switch for noises and music except for the error
siren which is always operational. Bright blue means sound is on,
darker blue means it is off.
NOTE: If you want to permanently change this setting then be sure
and click on the Battery so the setting is saved to Battery RAM.
(See 3.2.2.)
COPY OPTIONS
Format (In green)
Force a complete format of the disk copy even if all of the blocks
of the source disk are not utilized.
FS (In green)
Used to copy disks with a special format. This format was initially
created to have much faster disk access but was quickly abandoned.
Few programs use the FS format (except for some Freeware), and this
option is not normally selected.
NOTE: I have no clue how you know when you have such a Freeware
program that requires FS. Probably doesn't matter.
ZAP (In red)
If this option is activated (bright red), the copier reads only the
blocks indicated in the Volume Table Of Contents (VTOC), of the
original disk. If your original is not full, the reading of the disk
will be much faster. If this option is not selected, the copier will
read all the blocks of the disk. This option works the same in
writing. In this case you can force the formatting of blank tracks
with the FORMAT command (see section 4.1).
Mass Copy (Icon of several disks atop one another in red)
Activate this (bright red), and you only need a single read of the
source disk to make a number of copies. (After having installed and
read the source disk one time, one can copy to many disks without
having to re-read the original each time.
1) You can activated this option immediately after booting in which
case Photonix II will read one disk and then the drive(s) become
copy disks with Photonix II alternating between the two.
2) You can read the disk and when prompted to put in the copy to
disk you can activate Mass Copy.
3) Finally, you can make one copy and then activate Mass Copy.
You must deactivate Mass Copy if you need to read a different disk
after which you can reactivate Mass Copy for that disk.
Drive (In Red)
When active (bright red), the copy mode is entered and all you need
to do is follow the instructions contained in the disk windows to
begin the copying session.
If this option is inactive, the options "anti-virus" and
"verification" will be made without actually copying. In other
words, the reading of the source disk is all that is performed.
File (In red)
When active (bright red), Photonix II will reorganize the VTOC of
the destination disk to obtain a better efficiency for reading. This
option is very useful if you have performed a lot of erasures and
writes of files, etc.
There are two modes allowed for reorganization files (See 4.11). The
mode "Directory First," like its name implies, places all of the
sub-directories of the disk at the beginning of the storage space to
accelerate disk access.
The "Sequential" mode writes the files in the order they are found
in the directory. This mode permits, in theory, to reorganize system
disks but we advise that you make some tests to find which mode of
reorganization is the most efficient for the structure of the disk.
At the end of the reorganization, some statistics ar provided:
FILES Number of valid files on the disk.
DELETED Number of files that were preciously deleted and now the
space from these files has been recovered. (???)
DIR Number of directories on the disk in the
ROOT directory.
In the case of problems during the reorganization, the message
"Directory Damaged" appears and the operation is stopped. If
Photonix II thinks it has found some bad files, the list will be
shown.. Attention: During reorganization, only data errors on the
files were detected. Bad blocks were not taken into account. If this
list is important, you can move the cursor with the arrow keys as in
the directory screen, and ESC and RETURN keys allow return to the
main menu.
NOTE: The screen and sounds are so cool when this first starts. Give
it a try just to see and hear it work.
Check Mark (In red)
When active (bright red), Photonix II will verify, after writing,
that your disk is correctly copied. Surely, this will take a bit
more time, but at least you will be sure your copy is good. We
advise you use this option.
NOTE: This is the one area in Photonix that I'd like to see a
change. When an error is verified a thin red line is drawn
vertically in the green thermometer that crawls across the screen
indicating how much of the disk has been written. At the same time
a
distinctive sound is heard which is probably the error siren
mentioned in section 3.2.6. Well and good, if you don't hear it and
if you don't notice the red line(s) (perhaps you are doing a mass
copy so it starts on the next copy immediately upon finishing the
one with the errors), you can have a disk with errors in your
collection and be none the wiser.
SUGGESTION: Turn the volume way up, especially when doing a Mass
Copy, so you hear the error siren and can hit Esc to abort the
(Mass) Copy and substitute another disk for the defective one.
What I'd really like to see is an option to abort the copy on
verification error with a distinctive message on the screen
informing you just what happened.
Sourpuss Face - Anti Virus (In red)
When active (Icon bright red), when Photonix II reads the original
disk, it will indicate if there is a virus present or not.
In the case where a virus is present, the copy will be made without
the found virus. Attention: the virus on your original disk will
always be there because Photonix II does not modify original disks.
The "anti-virus" will automatically detect the most recent viruses:
Lode Runner, Dave, Starfighter I, and Starfighter II.
Photonix II will also automatically look for viruses on the boot
sectors of disks, but this options is more or less weak. If a virus
is detected, analyze the boot area of your disk. Nevertheless, you
try to follow the instructions of Photonix II, but without any
guarantee of success.
Disk and Cross aka "Disk Shaker" (In green)
When active (bright green), this option will cause a read or write
action to pause and Photonix II will prompt you to eject the
appropriate disk. You then tap the disk (softly) on its edge(s), and
then put the disk back in the drive. With a little luck the read or
write operation will start again and will proceed without further
errors.
Tapping is simply giving a few soft hits on the side of the disk. It
is not recommended to put your fingers on the surface of the disk at
any time!
Note: If it was a read operation that failed and you manage to
proceed by using Disk Shaker (or heartfelt prayer), you might
consider making a new master copy from the successful copy and
retire the original to your "Vault" of possibly flaky disks. Always
avoid the temptation to overwrite an original!
Write Protect Switch (In green)
When active (bright green), the original disk will be ejected if it
is not write protected with the write protect tab. This is to
prevent putting the original into the drive for the copy by mistake.
NOTE: This is one option that you *MUST* have active. It can save
you so much grief.
Option Panel (In gray)
This option will display a new menu with new options. (So cool the
fashion which it is displayed. These FTA guys are tops in my book!)
To choose an option, click in the corresponding box.
All of these options are automatically saved in the Battery RAM.
Reorganization
Choices: Directory First or Sequential
Permits the choice between 2 modes of reorganization.
See section 4.6 for a through discussion of the two.
Language
Choices: American/French (If you can read this manual, choose
American :-)
Reading
Choices: 1, 3, or 16 times.
Specifies the number of retries to write/read in case of an error
before the program officially announces an error. This option can be
used if you have a disk with a block of the program which is
difficult to read.
Change Drive
Choices: Yes/No
permits you to swap the functions of drives 1 and 2. This option can
only be activated if you have two drives.
Eject Sound
Choices: Classical or Burp (or do you say belch?)
Permits the choice between 2 disk eject sounds.
Gotta love that Belch!
Copy Mac Disk
Photonix II also correctly copies the 400K and 800K disk of the Mac
without problem. But, it is suggested to remove reorganization and
anti-virus options. In the event that a Mac disk is detected, the
message 'MAC DISK 400KB (or 800KB), is displayed along with the
volume name of the disk.